New laptop, new Linux distro

I finally got fed up with my Macbook Pro as a Linux laptop. It was a 2012 model, no longer supported by Apple. But the quirky implementation of Nvidia discrete graphics on the Macbook wasn’t the best for reliable Linux operation. Mind you, Nvidia is always a bit of a challenge, but Apple being Apple certainly does not help in that regard.

Anyway, I am currently sporting a Lenovo T460 from 2016. Still not really a new laptop, but fast enough for Linux and most things I do with it. It has a i5 6300U from the Skylake family of processors, 8GB memory (for now, supports up to 32GB) and a 1TB SSD. For graphics it used the Intel 520

For the OS, I am now running Nobara Linux 37. This is a Fedora derivative with tweaks for performance and gaming. While I am not a gamer, the improvements do help making it a snappy experience. Contrary to my desktop computer, I am now using the KDE version.

Current Nobara 37 desktop on my laptop

Getting used to KDE after having used Gnome for a long time can cause some frustrations. Not because what you want isn’t possible (typically quite the opposite) but because you cannot find it or know where to look. Where Gnome is has more of a ‘our way or the highway’ mentality and is more concerned with their vision than how the users are perceiving or using it, KDE is all about customization and providing the user with the ultimate choice. If you can dream it, KDE can probably be configured to do it. And that can be a bit overwhelming. It has so many options, sometimes you just have no idea where to look to achieve something.

So far, I am very happy. Both with the laptop, as well as Nobara Linux and KDE. I may have to switch my desktop to the same configuration soon… Now that I am getting the hang of KDE again, I remember why it was my default and go to desktop environment in the past, and the quirks and annoyances from Gnome seem to be more and more stuff I don’t really want to deal with no more. You shouldn’t have to hack together your environment around the limitations imposed by its maintainers. It’s Linux, not Windows or MacOS…

Upgraded laptop to Fedora 36

Fedora 36 with a few extension to make it the way I like it.

Upgrade was smooth as is to be expected with Fedora and everything is running smooth. Libadwaita is not as bad as I thought it to be, and it actually looks really good. I wish they had taken the time and effort to create a GTK3 theme for applications that are not libadwaita aware, but fortunately someone else did. It does look horribly inconsistent without. Bad move.

Other than this, I do not miss the theming at the moment now that I added some transparency in the top bar and dock.

Optimizing Linux for desktop performance

My daily driver is currently Pop!_OS, which is a desktop Linux distribution. It’s a very nice distribution, really good with Nvidia hardware (which isn’t a given on Linux) and, to me, a Gnome look that is very close to what I want so my GUI changes are minimal.

What’s less, and that is a more generic Linux problem, is that particularly the Linux kernel is optimized for server use and not desktop. It prioritizes throughput over latency, which is great for raw performance but less if you expect a smooth, fast GUI.

We can fix that.

Kernel

This first one is optional and controversial. Many will say a custom kernel is not needed and does not add anything. On my computer however, using the Xanmod kernel does make the GUI significantly faster and smoother. Installation instruction are on their page.

Second, we want to pass two boot parameters to the kernel when booting. If using systemd-boot, like Pop! does, open the corresponding file under /boot/efi/loader/entries and add:

nvme_core.default_ps_max_latency_us=0 pcie_aspm=off

to the line starting with options.

If using grub, add the same to the line GRUB_CMDLINE_LINUX_DEFAULT under /etc/default/grub and do a update-grub to activate.

Options

Part two is modifying the sysctl parameters. Under /etc/sysctl.d you will find files that set certain parameters on how your system works. Create a new file, and add the following:

# These are settings from /etc/sysctl.d/ and can be activated by running sysctl --system as root
# Save this file in that location.
#
# These settings set the disk caching for the system
#
vm.dirty_bytes = 33554432
vm.dirty_background_bytes = 8388608
vm.dirty_writeback_centisecs = 100
vm.dirty_expire_centisecs = 300
#
# We need to either use *_ratio, or we need to use *_bytes. We cannot use both. Currently
# using _bytes, so disabling _ratio
#
# vm.dirty_background_ratio = 10
# vm.dirty_ratio = 80
#
vm.page-cluster = 0
# Increased to improve random IO performance
fs.aio-max-nr = 1048576

This will set certain parameters pertaining to disk caching and IO performance. You can activate by running sysctl –system as root, or by rebooting your system.

Disk

To optimize your disks, if you are using SSD, it’s worth it to make some changes to your /etc/fstab. There’s two parts to this:

  1. Mount the root filesystem with settings optimized for SSD’s
  2. Ensure temporary directories are running from memory by mounting them in a tmpfs to limit disk writes and extend the life of your SSD.

For the first one, I mount my root device in /etc/fstab like:

<device>  /  btrfs  defaults,ssd,noatime  0  0

For the second, add these lines to /etc/fstab

# SSD tweak: temporary directories as tmpfs
tmpfs   /tmp       tmpfs   defaults,noatime,mode=1777   0 0
tmpfs   /var/tmp   tmpfs   defaults,noatime,mode=1777   0 0
tmpfs	/var/log	tmpfs	defaults,noatime,mode=0755	0	0
tmpfs	/var/spool	tmpfs	defaults,noatime,mode=1777	0	0

DISCLAIMER: Putting anything other than /tmp into memory, can produce unpredictable results in specific circumstances. It should be ok on desktop machines and helps to extend the life of your SSD by limiting writes. Do not enable on servers. Actually most of what is on this page may have an adverse effect on server performance.

Activate by rebooting your system. Enjoy a faster, more responsive system.

[FEB 8/22 UPDATE]: Since publishing this article I have moved from Pop!_OS to Fedora. Fedora is a cutting edge distribution, which does not require all of these tune-ups to make a snappy OS out of the box.

Let’s elaborate.

  • The kernel parameters mentioned above do not need to be updated on Fedora
  • The sysctl.d modifications are not required on Fedora, but they are done simply because I have more than plenty memory anyway. Out of the box default settings on Fedora are better than those of Pop!_OS
  • The disk optimizations in /etc/fstab are set by default

Fedora Update

Fedora uses a different package management system than Pop!_OS, which is Ubuntu based. While Debian derivatives like Ubuntu and Pop!_OS use apt as their package manager, Fedora is RedHat based. RedHat uses rpm files which are managed by yum or dnf (depending on the version of the OS).

By default, dnf is quite slow compared to apt but this is easily fixed by adding some parameters to the configuration file.

[main]
gpgcheck=1
installonly_limit=3
clean_requirements_on_remove=True
best=False
skip_if_unavailable=True
max_parallel_downloads=10
fastestmirror=True

The two bottom bold lines need to be added to /etc/dnf/dnf.conf. The first one increases the number of simultaneous download connections to 20, which increases download speed. The second one looks for the fastest mirror from your location, which ensures you will get the maximum possible download speed. Combined, these make dnf operate as fast or faster than apt on most systems.

Due to the nature of a bleeding edge distribution like Fedora, it can sometimes be tricky to update. Especially the kernel and / or kernel drivers. To avoid such problems, I run updates with the --exclude=kernel* flag. In fact, I wrote a function for my Fishshell to get and install updates without kernel, like so:

function up2date
  sudo dnf upgrade -y --refresh --exclude=kernel\*
end

And saved it as up2date.fish under $HOME/.config/fish/functions

Moving a Linux install to a new disk

Recently I had to move my Linux install from one drive to another, as I was experiencing some issues with a WD SN550 nvme drive causing some short random freezes of the GUI with IO intensive tasks. Since I also have a Samsung nvme drive installed, I decided to see if the problem persists on the other drive.

But… Having a fully configured and customized Linux install is a pain in the behind to redo. I did not want to clone, because I made a mistake during install the previous time and it installed in legacy MBR mode, so I wanted to do a proper install using UEFI mode. But preferably not having to re-do all the setup and customizations.

And I didn’t have to. Apt to the rescue.

$ apt-mark showauto > pkgs_auto.lst
$ apt-mark showmanual > pkgs_manual.lst

This will generate a list of .deb packages installed on the system. The first one with all the automatically installed packages, the second one all the manually installed packages from the commandline.

I also made a backup of /etc/apt/sources.list.d and /etc/apt/trusted.gpg.d. The first directory contains all the repositories I had in use on the original install, and the second directory holds all the GPG keys that go with these repositories. Important!

First install the system on the new drive, and make sure all updates are installed. You don’t need to install or setup anything but the base system. Now you can continue with the back ups and files you created earlier.

After I moved the two directories above to their respective place on the new install, and of course doing an sudo apt update && sudo apt upgrade to make sure all packages are still up to date, I loaded up the list of packages I created earlier.

$ sudo apt install $(cat pkgs_auto.lst)
$ sudo apt install $(cat pkgs_manual.lst)

This will create some errors due to packages that cannot be installed like this, or packages that were installed from a .deb file and aren’t located in any repository. Clean up those entries, and try again and let it run.

When it is finished, copy your /home/<user> from your old drive to your new drive and when you reboot and log back in as your user, everything should be just as it was before.

Success!

Linux and a little rant

Allow me to start with the rant bit first. I took my first steps in the world of Linux around 1993, 1994. Back then, Linux was still pretty new and very few distributions existed. Debian just spawned into life. RedHat wouldn’t come to life until mid 1995. There were no big Internet forums or user communities. Most people using Linux were computer engineers that knew how to build a Linux system from scratch and didn’t take newbie kid questions all too well. N00b questions were typically quickly and swiftly dealt with by a grump “RTFM” and you were left to do a lot of reading and figuring it out yourself. None to hold your hand and do the hard work for you. Annoying at times, but when you did figure it out it gave you a real sense of accomplishment. This is how I learned my way around Linux.

Fast forward to today, and you have hundreds of distributions. Some are touted as ‘beginner distros’, others as ‘advanced distros’. Let me shoot that down immediately. There are only user-friendly distros and user-unfriendly distros. Some extremely user-unfriendly. Functionally, they can all to the same. There is not some magical advanced functionality in these so-called ‘advanced distros’ not available in the ‘beginner distros’. The only difference between the two is that the ‘beginner’ distros are as easy to initially set up and run as your typical Windows or MacOS install and don’t offer too many customization choices to confuse you and provide you with a default set of applications you may or may not use, to get you started, while the ‘advanced’ distros pretty much require you to be a masochist and think and decide about every step. Once they are up and running, they work pretty much the same and can do the same. There is literally nothing one of these ‘advanced’ distros can do you cannot also do on one of these ‘beginner’ distros.

This gets me to the users… Some of these ‘advanced’ distro users feel they are sooo smart. They consider everybody that uses a ‘beginner’ distro to be a n00b that should be pitied as they cannot begin to grasp the advancedness of their knowledge and their choice of distribution. This holds particularly true to a significant portion of the Arch Linux community. They think they are so smart for using a distribution that only installs a basic system and dumps you to the command-line so you can use their package manager to install the stuff you actually want on your system. Don’t get me wrong, it is a very valid philosophy that avoids cluttering up your disk with GB’s of stuff you’re never going to be looking at. But it is not advanced.

Back in the day, you had to download the sources for just about everything because if you wanted something that wasn’t installed by default, it probably didn’t have a binary available for your system. You’d have go through the documentation, find and fix all the dependencies yourself (often also by compiling and installing the right versions, in order) and then compile your application from source, hoping it actually would compile without errors you’d then have to debug and fix before trying again. And when it was finally installed, it probably didn’t work until you build your configuration files manually.

Telling a package manager which software you want to install only for the package manager to download it for you from a central repository, fix any dependencies automatically and install your selected package so it works is not anything advanced. It’s just manual work. It’s typing dumb commands on the command prompt. It does not make you some Linux Guru. It doesn’t even give you any usable extra knowledge. If you enjoy doing things that way, all the more power to you. But don’t be some cocky arrogant SOB that belittles others for not wanting to do that. It doesn’t make your install better, just leaner, it doesn’t make you smarter and behaving like that only makes you a prick.

There are a lot of people that have heard enough about Linux to be curious and wanting to try it, that are permanently put-off by the arrogance and belittlement of the Linux community. People should try to remember they too had to learn at some point and realize there are no stupid questions, only stupid answers. More competition means more and better choices for us as users, but for that to happen new users that are willing to learn something new should be encouraged, not belittled for being new and put down until they give up to never return.

If you want to try Linux, just do it. Pick a distro you like and stick with it. Don’t be fooled into believing the nonsense about beginner and advanced distributions, thinking at some point you need to upgrade to get a more advanced version. They can all be customized to look like whatever you want, they can all have the same functionality, there is not a single one that is better than the rest. There is only personal preference of the users using them. That’s not to say it cannot be fun to do some distro hopping to find the one that really suits you. Just as long as you remember its preference, not functionality that makes the difference.

Accessing WSL on Windows 11

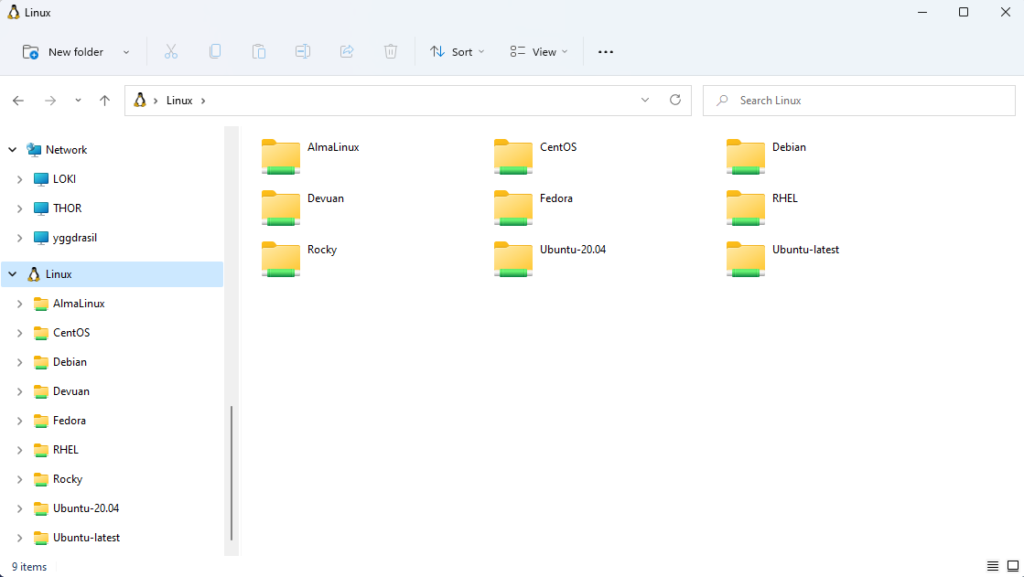
WSL filesystems in Windows Explorer on Windows 11

Moving files around between WSL instances and Windows just got a whole lot easier on Windows 11. All you need to do is scroll down in the left pane until you see Linux and can access the filesystem from any WSL instance to copy files to it, grab files from it and whatever it is you need.

Previously on Windows 10, you could access the special UNC path \\wsl$ to access the filesystem of a running WSL instance, but in Windows 11 you can access any WSL instance without the need to have it running.

Windows 11 on a unsupported computer

Yes, you can run the new Windows 11 beta or development versions on unsupported hardware. Yes, you will have heard all about it already. No, not every method is the same or works as well.

That said, most of what you see online are in my opinion methods that are not guaranteed to work or can in some cases be problematic.

This method described below always works, on every computer that can run and install Windows 10. Most likely, it will work with the release version of Windows 11, but we will have to wait to be sure obviously.

Step 1: Creating a Windows 10 ISO

Download the Media Creation Tool from the Microsoft site, run it and accept the license terms. It will get some things ready, or so it says so just wait.

When it is done, you are presented with two options:
o Upgrade this PC
o Create installation media (USB flash drive, DVD, or ISO file) for another PC

Select the second option and click next.

Select your language, edition and architecture and click next.

Select ISO image and click next. It will prompt you for a filename and location to save to. Then it should start downloading and generating your ISO file. Just let it run its course.

Step 2: Creating a Windows 11 ISO

Go to the UUP Dump website. This site will help you generate scripts to download and compile an ISO for the Windows software of your choice.

Note: These scripts download the necessary files directly from Microsoft, so it is safe and not some unknown source.

As of this writing, the latest version is “Windows 11 Insider Preview 10.0.22000.100 (co_release) amd64“. Click the release of your choice.

Select your language and click next.

Select your edition(s) and click next. I would choice just Windows 11 Pro here, however it is up to you.

Select Download and convert to ISO and below that, check all but component cleanup under conversion options. Click Create download package.

It will create and download a small zip file of a few kilobytes that contains scripts to create your ISO on Windows, MacOS or Linux.

Open an command prompt as Administrator and run the appropriate script. On Windows that would be uup_download_windows.cmd. Running this will take a while. Let it run. Go have a coffee. When it is done, you will have a Windows 11 ISO.

This ISO can be used on a supported machine to upgrade or install as normal.

Step 3: Creating a hybrid W10/W11 ISO

First we need to extract the Windows 10 ISO we created under Step 1. If you have a program like WinRAR, you can just right click the ISO file and extract or you can double click the ISO file to mount it, and then just copy all files and directories to a place on your hard disk.

When you have the contents of the Windows 10 ISO on your hard disk, navigate to the sources folder in the location you extracted or copied the ISO files to and find the file called install.esd. Delete it.

Now double click the Windows 11 ISO you created and navigate to the sources folder here as well. Again, find the file called install.esd. Copy it, and paste inside the sources folder of your Windows 10 files on your hard disk.

Now you basically have a Windows 10 DVD structure on your hard disk with Windows 11 content. We can now convert this file structure into a new, hybrid W10/W11 ISO.

First, you will need to download and install ImgBurn. Start the program and select Create image file from files/folders. It’s the middle option on the right side.

Select your source by selecting the location of your extracted or copied Windows 10 ISO on your hard disk where we just copied the Windows 11 install.esd to.

Select a destination where you want to save your newly created hybrid ISO to.

Under the advanced tab on the right side of the window, select “Bootable Disc” and make sure to check “Make Image Bootable”.

For the Boot image, browse to boot folder where you extracted your ISO on your hard disk and select the file etfsboot.com.

Lastly, under “Sectors To Load”, change the default of 4 to 8.

Now click the big button on the left bottom to create your new Hybrid ISO. This will be very quick.

Final words

What you have just created is a Windows 10 install disk that contains the Windows 11 files. Because of this, no pre-install checks on TPM, Secure boot or CPU are done and Windows 11 will be installed just like you are used to for Windows 10. After the install is finish, Windows does not do any post-install checks and it just boots and runs.

However, if you are like me and don’t meet most of the hardware requirements, you cannot turn on the Windows Insider option so you can download and install updates as they become available. To fix this, visit this GitHub site to download a small script to enable the Insider channel of your choice (mine is Beta) without even having to log in.

Monitoring your network or homelab using Zabbix and Grafana

For the longest time, I have been monitoring my network and homelab using Observium. This worked and does work very well. Observium is very good at what it does. However, there are a couple of things that do not work so well for me using Observium:

  • Observium does not let me add applications to monitor very easily or at all
  • Observium is limited to what can be offered through SNMP
  • Observium is not open source and as such it cannot be modified or changed to your needs
  • Observium is not an application I have come across in my professional life, so knowing how it works does not help me professionally.

That last bit is obviously not a necessity, however I do feel it’s always a nice thing to be able to apply things you have learned in your homelab into your professional environment.

After lots of investigations and trial & error, I have settled on using Zabbix for my monitoring needs. Zabbix is open source product that is used a lot in corporate environments and it is very flexible and extensible. Obviously you could add or change code as it is open source, but you don’t really need to. As Zabbix is template driven, its functionality can be extended by adding templates and there is a plethora of templates available for Zabbix, both on the Zabbix site itself (Zabbix Share) as well as places like GitHub. Also, Zabbix can use an agent installed on the system to collect the data you want to monitor, or you can use SNMP if you can’t or don’t want to install an agent on a device (for instance a network router).

The one thing I do not like about Zabbix is that the historic view is not easy to get to, nor as pretty displayed in a dashboard-like view as it is in Observium. However, that is not a blocker as we can use Grafana, another open source tool that is used quite a bit in Corporate Land to create dashboards and display relevant historic data.

Installing Zabbix

Installing Zabbix is no more complicated than installing most other software on Linux. I installed Zabbix on my Raspberry Pi 2B and the short version is this:

a. Install the Zabbix repository:
# wget https://repo.zabbix.com/zabbix/5.4/raspbian/pool/main/z/zabbix-release/zabbix-release_5.4-1+debian10_all.deb
# dpkg -i zabbix-release_5.4-1+debian10_all.deb
# apt update

b. Install the Zabbix server, frontend and agent on the server machine
# apt install zabbix-server-mysql zabbix-frontend-php zabbix-apache-conf zabbix-sql-scripts zabbix-agent

c. Create the database for Zabbix
# mysql -uroot -p
password
mysql> create database zabbix character set utf8 collate utf8_bin;
mysql> create user zabbix@localhost identified by 'password';
mysql> grant all privileges on zabbix.* to zabbix@localhost;
mysql> quit;

And import the database schema
# zcat /usr/share/doc/zabbix-sql-scripts/mysql/create.sql.gz | mysql -uzabbix -p zabbix
If your database is not residing on your Zabbix server, you can add -h <server> to the above to make sure you are connecting to the remote database server. Also, when creating the user and you are using a remote database, make sure the Zabbix user is allowed to connect over the network to the database.

d. Configure the Zabbix server to use the database you have created by filling out the relevant fields in /etc/zabbix/zabbix_server.conf

e. Start your brand-new Zabbix server:
# systemctl restart zabbix-server zabbix-agent apache2
# systemctl enable zabbix-server zabbix-agent apache2

f. You are done. You can now login to your server on http://<server>:3000 and log in with user Admin and password zabbix and configure everything else using the web frontend.

Installing Grafana

Installing Grafana is equally simple.
a. Install the pre-requisites and add the repository key
sudo apt-get install -y apt-transport-https
sudo apt-get install -y software-properties-common wget
wget -q -O - https://packages.grafana.com/gpg.key | sudo apt-key add -

b. Add the repository
echo "deb https://packages.grafana.com/oss/deb stable main" | sudo tee -a /etc/apt/sources.list.d/grafana.list

c. Install Grafana
apt update
apt install grafana

d. Then it is just a matter of starting the Grafana server and making sure it starts at boot.
systemctl daemon-reload
systemctl start grafana-server
systemctl status grafana-server
systemctl enable grafan-server

That’s it! You can now log in using the default username/password of admin/admin.

Note: if you want to apply specific configurations, like for instance database (mysql, postgres, sqlite3) beyond the default, you should refer the Grafana manuals as that would be a bit beyond the scope of this page.

Tying things together…

First you will need to install the Zabbix app into Grafana. We can do this using the commandline interface for Grafana:

grafana-cli plugins install alexanderzobnin-zabbix-app

After you do this, you can configure the Zabbix datasource. Go to Configuration -> Data sources and click “add data source”. Scroll down to the bottom, and you will see one called ‘Zabbix’.

Fill in the details of your Zabbix installation, and make sure you add the api_jsonrpc.php to the end of your URL. Check ‘With credentials’ under auth and under Zabbix API details add your username and password. Click “Save & test” and if all is ok, it will give you a green checkmark while saying data source updated.

You are now ready to add a dashboard to your Grafana and start monitoring your Zabbix data. I use this dashboard from Paulo Paim. You can add it by going to Dashboards -> Manage and then clicking the import button. In the box saying import from grafana.com, type the ID of the dashboard. In this case 5363 and click load.

That’s it!

Links:
Zabbix manual
Grafana documentation
Zabbix templates and add-ons
Grafana dashboards and plugins

Prettify your fish shell

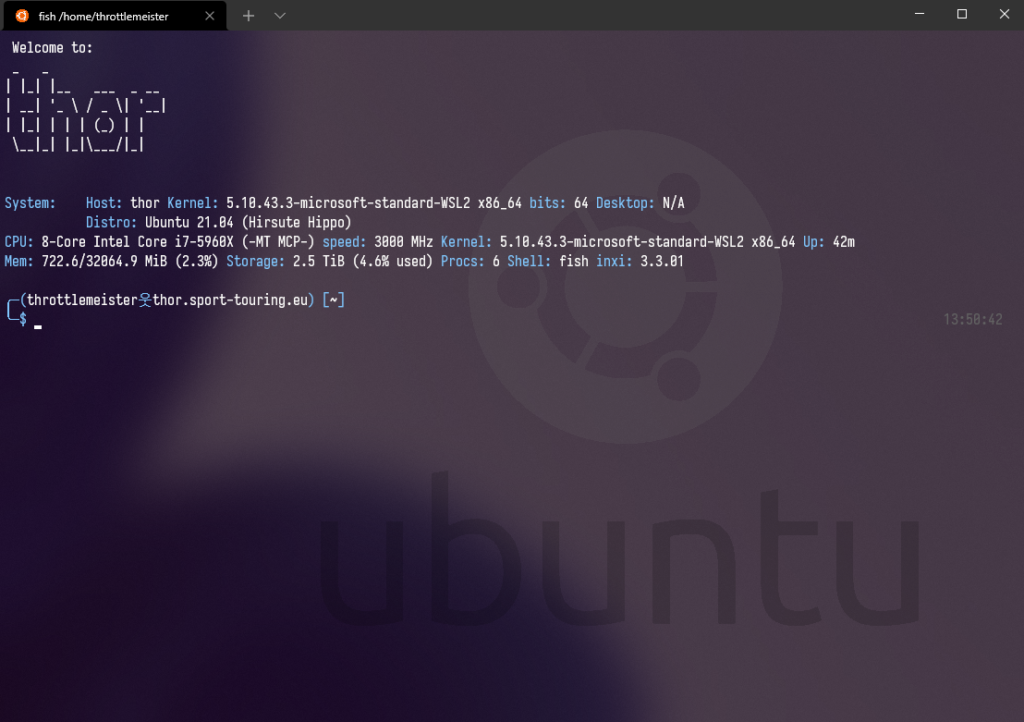
Windows Terminal running Ubuntu in WSL2 with Fish

I am using the fish shell these days. Fish stands for Friendly Interactive Shell. I like how programming the shell works and it has some very nice features like syntax and command highlighting you will not find in regular shells.

Note: important note if you are considering to use fish, fish is not a POSIX compliant shell. As such, for shell scripts that will need to work on any system you will still need to know how to script in sh/bash/ksh/etc. I do not consider fish to be a replacement for bash and it should not be the default shell on any system. It’s great as your interactive shell when working the console though.

With that out of the way, using a different or alternate shell can be fun but you probably also want it to look good. Or you want it to look the same or similar to your previous shell because that is what you are used to. As did I. I had a pretty nice prompt setup in bash, so I really wanted my fish shell to look and feel similar. This was the result:

fish prompt for root and regular user

To get this prompt, I created the following fish_prompt.fish under ~/.config/fish/functions.

# This theme is based on Bira theme from oh-my-fish (https://github.com/oh-my-fish/theme-bira)
# This theme also based on the default bash prompt of Kali Linux. (https://www.kali.org/)
# Created, modified and where possible bluntly stolen by throttlemeister.
#
# Bira theme from oh-my-fish listed abouve, based on:
# Theme based on Bira theme from oh-my-zsh: https://github.com/robbyrussell/oh-my-zsh/blob/master/themes/bira.zsh-theme
# Some code stolen from oh-my-fish clearance theme: https://github.com/bpinto/oh-my-fish/blob/master/themes/clearance/

function __user_host
  set fqdn (hostname -f)
  set -l content 
  if [ (id -u) = "0" ];
    echo -n (set_color --bold yellow)\((set_color --bold red)$USER(set_color --bold yellow)💀(set_color --bold red)$fqdn(set_color --bold yellow)\) (set color normal)
  else
    echo -n (set_color --bold blue)\((set_color --bold white)$USER(set_color --bold blue)웃(set_color --bold white)$fqdn(set_color --bold blue)\) (set color normal)
  end
end

function __current_path
  if [ (id -u) = "0" ];
    echo -n (set_color --bold yellow) [(set_color --bold white)(prompt_pwd)(set_color --bold yellow)] (set_color normal)
  else
    echo -n (set_color --bold blue) [(set_color --bold white)(prompt_pwd)(set_color --bold blue)] (set_color normal) 
  end
end

function _git_branch_name
  echo (command git symbolic-ref HEAD 2> /dev/null | sed -e 's|^refs/heads/||')
end

function _git_is_dirty
  echo (command git status -s --ignore-submodules=dirty 2> /dev/null)
end

function __git_status
  if [ (_git_branch_name) ]
    set -l git_branch (_git_branch_name)

    if [ (_git_is_dirty) ]
      set git_info '<'$git_branch"*"'>'
    else
      set git_info '<'$git_branch'>'
    end

    echo -n (set_color yellow) $git_info (set_color normal) 
  end
end

function fish_prompt
  if [ (id -u) = "0" ];
    echo -n (set_color --bold yellow)"╭─"(set_color normal)
  else
    echo -n (set_color --bold blue)"╭─"(set_color normal)
  end
  __user_host
  __current_path
  __git_status
  echo -e ''
  if [ (id -u) = "0" ];
    echo (set_color --bold yellow)"╰─""# "(set_color normal)
  else
    echo (set_color --bold blue)"╰─""\$ "(set_color normal)
  end
end

function fish_right_prompt
  set -l st $status

  if [ $st != 0 ];
    echo (set_color red) ↵ $st  (set_color normal)
  end
  set_color -o 666
  date '+ %T'
  set_color normal
end

Note: the latest version of this script can always be found on my GitHub here.

This prompt was, as the top comments indicate, not all my own and heavily borrowed and modified other prompt and resources. This exercise greatly helped me to understand the fishshell scripting language. This helped me to create some more scripts and functions to make my life in fish easier and simpler.

Mind you, sometimes bash is a lot simpler. For the same prompt, including checks for color support etc, the full bash equivalent for this in my .bashrc is this:

if [ -n "$force_color_prompt" ]; then
    if [ -x /usr/bin/tput ] && tput setaf 1 >&/dev/null; then
        # We have color support; assume it's compliant with Ecma-48
        # (ISO/IEC-6429). (Lack of such support is extremely rare, and such
        # a case would tend to support setf rather than setaf.)
        color_prompt=yes
    else
        color_prompt=yes
    fi
fi

if [ "$color_prompt" = yes ]; then
    PS1='${debian_chroot:+($debian_chroot)}\[\033[01;32m\]\u@\h\[\033[00m\]:\[\033[01;34m\]\w\[\033[00m\]\$ '
else
    PS1='${debian_chroot:+($debian_chroot)}\u@\h:\w\$ '
fi

host=`hostname -f`

if [ "$color_prompt" = yes ]; then
    prompt_color='\[\033[;94m\]'
    info_color='\[\033[0;1m\]'
    prompt_symbol=웃
    p_col='\[\033[1;33m\]'
    if [ "$EUID" -eq 0 ]; then # Change prompt colors for root user
        prompt_color='\[\033[1;33m\]'
        info_color='\[\033[1;31m\]'
        prompt_symbol=💀
        p_col='\[\033[0;1m\]'
    fi
    PS1=$prompt_color'┌──${debian_chroot:+($debian_chroot)──}('$info_color'\u'$p_col'NULL'$info_color'$host'$prompt_color')-[\[\033[0;1m\]\w'$prompt_color']\n'$prompt_color'└─\$\[\033[0m\] '
    # BackTrack red prompt

else
    PS1='${debian_chroot:+($debian_chroot)}\u@\h:\w\$ '
fi

Where basically only the last bit is what makes the prompt. And even that can be concatenated into a single line if you insert the colors directly instead of setting variables.

As short as possible: application containers, system containers, virtualization

Sometimes, there is a bit of confusion as to what the difference is between application containers (Docker, Podman, K8S, OpenShift), system containers (LXC/LXD) and virtualization (KVM, Vmware, Hyper-V, Xen) and when you should use them. I will try to explain the differences as short as possible.

Application containers
Application containers are created with the most minimal environment to run a specific application. This includes the OS and all dependencies for that application. Every tool or program normally present in the OS that is not needed to run the application is typically left out so that the container image is a small as possible and performs as fast as possible.

Examples of application containers are Docker, Podman, Kubernetes and OpenShift.

System containers
System containers are typically as the minimal environment needed to run a specific operating system. All the basic tools are present, including the package manager so you can set up the system as you want with all the tools you need. A system container is like a virtual machine, but without the hardware virtualization layer. A system container uses and identifies the host hardware and runs the same kernel as the host. This means it is much lighter on resources than full blown virtualization, but also that in certain cases it can be incompatible with certain software.

Examples of system containers are LXC, LXD

Virtualization
Virtualization is software that emulates the hardware so that more than one virtual machines can be installed on the same physical hardware at the same time. As the full hardware layer needs to be simulated, it has the most overhead of these options but it also is the most compatible with all software.

There are two types of virtualization:

Type 1 hypervisors: virtualization is done by the kernel, providing low-level access to the physical hardware for the virtualization software for increased performance.
Examples of Type 1 hypervisors: KVM, Vmware ESXi, Hyper-V Server

Type 2 hypervisors: virtualization is done by an application installed on an operating system. Access to hardware must be done through the OS and no direct access is possible. IT provides convenience over performance, as it can run on any sytem.
Examples of Type 2 hypervisors: Vmware Workstation, VirtualBox, Hyper-V manager

Powered by atecplugins.com