Transactional updates on OpenSUSE Tumbleweed

It’s possible to use transactional or atomic updates on OpenSUSE Tumbleweed and leveraging the snapshot capabilities of btrfs. It’s actually quite simple; all you need to do is to install the command using zipper.

Prerequisites: the filesystem must be btrfs.
sudo zypper in transactional-update

This will install the command. Next you want to set up some, to prevent some potential issues.

# this systemd service is required to create RPM dirs in /var as TU does not mount /var in the new snapshot to maintain atomicity.
systemctl enable --now create-dirs-from-rpmdb.service

That’s basically it. Now if you run the command:

sudo transactional-update

The system will create a new snapshot, check for updates, install updates on that snapshot and set that snapshot to boot. If there are no updates, the snapshot is removed again.

Keep in mind, and this is important: any changes you make to the root filesystem will be gone after you reboot into the new snapshot.

This is expected behavior, but it does mean if you want or need to make changes you need to make sure you reboot first.

Why would you want this? If you need to apply a big update and you don’t want it to interrupt your work or avoid processes being restarted, you can apply the update on a new snapshot without it interfering or making changes in any way on the running system.

Is it necessary? Absolutely not. It is just another tool in the toolbox. It offers some of the advantages (atomic updates) of an immutable distribution, without having to have an immutable (read-only) filesystem.

OpenSUSE Tumbleweed, 6 months in

Well, here we are, 6 months after installing OpenSUSE Tumbleweed and still no urge to change. The only change I am longing for is the update to KDE Plasma 6, which should be coming soon now that it has officially been released.

Since there are basically no updates since my last post in December, there isn’t much to say. I did however made some changes. A couple of weeks ago, my GTX1080 decided to shit itself such that it triggers the short protection in the power supply so that’s out. Bit of a pain since everything is water cooled. I ended up replacing it with a Sapphire R9 390 Nitro which is an AMD based card. Raw speed is about half of that of the GTX1080, but at 50 euros it was cheap and being AMD means no more Nvidia issues on Linux as limited as they were for me. Main issue for me was that I had to manually recreate the initrd whenever a new driver version was released to make it work.

Routing of the watercooling soft tubing looks like crap now, but hey, its working again and at least I can use my machine again.

Changing from Nvidia to AMD was a bit of a pain as I had to remove all Nvidia related packages and I had to manually set the correct kernel parameters to make it work. After that it was painless and working just fine. Drivers are part of the kernel, so no more issues there. Test benchmarks suits show lower fps as to be expected, but also smoother and less jerky graphics. I don’t game that much, so I guess I’ll be fine for now. Would love me some 6700XT or something.

Tumbleweed keeps on rocking.

OpenSUSE: 4 months in

Maybe it is time for a little update, even if there is not much to say. After 4 months of running OpenSUSE Tumbleweed, I can honestly say I have not had a single moment where I’d thought I should maybe look for another distribution because XYZ is getting too annoying.

Of course it does have some annoyances. Some are with me, like running systemd-boot while it is not officially ready for primetime yet. Others are with OpenSUSE or my setup, like sometimes an update will bork the system and I have to do a snapper rollback. Fortunately, OpenSUSE makes this a 2 minute job and so far, rolling back the update and installing it again is all that is needed to fix the system and the update.

Other than that, I can’t even really think of anything. It just works. It runs, it runs fast, I have all the latest packages as you can expect using a rolling release and I just get to enjoy using my computer and play around with it. Both my desktop as well as my laptop.

It’s nice to be able to use the computers without this itch or little doubt that makes one go and look for greener pastures.

I’m still impressed, really impressed with OpenSUSE. More should be using it, it really is that good. And a bit of counterweight to the giants like Canonical and Redhat would be nice too.

Have a good one.

systemd-boot on OpenSUSE

I am weird sometimes, I know. Ever since I used Pop!OS, which uses systemd-boot as default boot manager, I have fallen in love with it. The simplicity and speed of systemd-boot versus the complexity and bulk of GRUB2 just won me over.

Mind you, GRUB2 is very good at what it does. It’s just that I don’t need all it does. All I need is to boot my machine, nothing more, nothing less. My laptop, on which I am typing this, only has OpenSUSE installed. No dual boot, nothing. My desktop boots OpenSUSE and FreeBSD at the moment, but they do so from seperate disks with their own bootloader. Nice and simple.

Neither need the features of GRUB2.

That said, changing the bootloader is tricky. It’d be nice if OpenSUSE would let you pick systemd-boot at install, so you don’t have to muck with it. However, since end of September, OpenSUSE officially supports systemd-boot.

So, I just had to have it, starting with my laptop.

HOW-TO

Note: I do not use secureboot. Do not blindly follow this tutorial if you are using secure boot: it will break your system. You can do it, but it requires more steps then I will outline here.

First, check if /usr/lib/bootloader/systemd-boot exists. If it does, you’re good.

Remove all OpenSUSE entries from the EFI boot menu, and all others you do not need:

# efibootmgr --delete --label opensuse-secureboot

Do this for each entry you do not need or want. You can see what entries there are by just typinge efibootmgr without any options.

Next we want to update the configuration, so it knows we are going to use systemd-boot.

# vi /etc/sysconfig/bootloader 

Change from (probably) LOADER_TYPE="grub2-efi" to LOADER_TYPE="systemd-boot"

Install the systemd-boot utils to add support for snapshots. We are running OpenSUSE, we do want support for our automatic btrfs snapper snapshots.

# zypper in sdbootutil-snapper sdbootutil-rpm-scriptlets

If zypper complains that it needs to remove GRUB2 to do this, confirm by choosing the solution that will do so. It will both add all the files required for systemd-boot to function and remove all grub2 related files that you will not be using anymore.

Then we want to install our kernels, including snapshots so we can actually boot as we do not have a bootmanager installed right now!

# sdbootutil install
# sdbootutil add-all-kernels

Now we’re done. Systemd-boot is installed, GRUB2 is removed and we can reboot our system and enjoy a fast and less bloated setup. If you want to get to the boot menu to boot from a snapshot, just hold the spacebar while booting and it will pop up.

Issues / challenges

  • Initrd / ramdisk does not get updated after installation / update of kernel drivers, ie NVIDIA graphics drivers. This can be solved by manually generating a new initrd file and copying it to the appropiate location, replacing the old one but should really be done automatically. Bug is filed.

Optimizing Linux for desktop performance

My daily driver is currently Pop!_OS, which is a desktop Linux distribution. It’s a very nice distribution, really good with Nvidia hardware (which isn’t a given on Linux) and, to me, a Gnome look that is very close to what I want so my GUI changes are minimal.

What’s less, and that is a more generic Linux problem, is that particularly the Linux kernel is optimized for server use and not desktop. It prioritizes throughput over latency, which is great for raw performance but less if you expect a smooth, fast GUI.

We can fix that.

Kernel

This first one is optional and controversial. Many will say a custom kernel is not needed and does not add anything. On my computer however, using the Xanmod kernel does make the GUI significantly faster and smoother. Installation instruction are on their page.

Second, we want to pass two boot parameters to the kernel when booting. If using systemd-boot, like Pop! does, open the corresponding file under /boot/efi/loader/entries and add:

nvme_core.default_ps_max_latency_us=0 pcie_aspm=off

to the line starting with options.

If using grub, add the same to the line GRUB_CMDLINE_LINUX_DEFAULT under /etc/default/grub and do a update-grub to activate.

Options

Part two is modifying the sysctl parameters. Under /etc/sysctl.d you will find files that set certain parameters on how your system works. Create a new file, and add the following:

# These are settings from /etc/sysctl.d/ and can be activated by running sysctl --system as root
# Save this file in that location.
#
# These settings set the disk caching for the system
#
vm.dirty_bytes = 33554432
vm.dirty_background_bytes = 8388608
vm.dirty_writeback_centisecs = 100
vm.dirty_expire_centisecs = 300
#
# We need to either use *_ratio, or we need to use *_bytes. We cannot use both. Currently
# using _bytes, so disabling _ratio
#
# vm.dirty_background_ratio = 10
# vm.dirty_ratio = 80
#
vm.page-cluster = 0
# Increased to improve random IO performance
fs.aio-max-nr = 1048576

This will set certain parameters pertaining to disk caching and IO performance. You can activate by running sysctl –system as root, or by rebooting your system.

Disk

To optimize your disks, if you are using SSD, it’s worth it to make some changes to your /etc/fstab. There’s two parts to this:

  1. Mount the root filesystem with settings optimized for SSD’s
  2. Ensure temporary directories are running from memory by mounting them in a tmpfs to limit disk writes and extend the life of your SSD.

For the first one, I mount my root device in /etc/fstab like:

<device>  /  btrfs  defaults,ssd,noatime  0  0

For the second, add these lines to /etc/fstab

# SSD tweak: temporary directories as tmpfs
tmpfs   /tmp       tmpfs   defaults,noatime,mode=1777   0 0
tmpfs   /var/tmp   tmpfs   defaults,noatime,mode=1777   0 0
tmpfs	/var/log	tmpfs	defaults,noatime,mode=0755	0	0
tmpfs	/var/spool	tmpfs	defaults,noatime,mode=1777	0	0

DISCLAIMER: Putting anything other than /tmp into memory, can produce unpredictable results in specific circumstances. It should be ok on desktop machines and helps to extend the life of your SSD by limiting writes. Do not enable on servers. Actually most of what is on this page may have an adverse effect on server performance.

Activate by rebooting your system. Enjoy a faster, more responsive system.

[FEB 8/22 UPDATE]: Since publishing this article I have moved from Pop!_OS to Fedora. Fedora is a cutting edge distribution, which does not require all of these tune-ups to make a snappy OS out of the box.

Let’s elaborate.

  • The kernel parameters mentioned above do not need to be updated on Fedora
  • The sysctl.d modifications are not required on Fedora, but they are done simply because I have more than plenty memory anyway. Out of the box default settings on Fedora are better than those of Pop!_OS
  • The disk optimizations in /etc/fstab are set by default

Fedora Update

Fedora uses a different package management system than Pop!_OS, which is Ubuntu based. While Debian derivatives like Ubuntu and Pop!_OS use apt as their package manager, Fedora is RedHat based. RedHat uses rpm files which are managed by yum or dnf (depending on the version of the OS).

By default, dnf is quite slow compared to apt but this is easily fixed by adding some parameters to the configuration file.

[main]
gpgcheck=1
installonly_limit=3
clean_requirements_on_remove=True
best=False
skip_if_unavailable=True
max_parallel_downloads=10
fastestmirror=True

The two bottom bold lines need to be added to /etc/dnf/dnf.conf. The first one increases the number of simultaneous download connections to 20, which increases download speed. The second one looks for the fastest mirror from your location, which ensures you will get the maximum possible download speed. Combined, these make dnf operate as fast or faster than apt on most systems.

Due to the nature of a bleeding edge distribution like Fedora, it can sometimes be tricky to update. Especially the kernel and / or kernel drivers. To avoid such problems, I run updates with the --exclude=kernel* flag. In fact, I wrote a function for my Fishshell to get and install updates without kernel, like so:

function up2date
  sudo dnf upgrade -y --refresh --exclude=kernel\*
end

And saved it as up2date.fish under $HOME/.config/fish/functions

Moving a Linux install to a new disk

Recently I had to move my Linux install from one drive to another, as I was experiencing some issues with a WD SN550 nvme drive causing some short random freezes of the GUI with IO intensive tasks. Since I also have a Samsung nvme drive installed, I decided to see if the problem persists on the other drive.

But… Having a fully configured and customized Linux install is a pain in the behind to redo. I did not want to clone, because I made a mistake during install the previous time and it installed in legacy MBR mode, so I wanted to do a proper install using UEFI mode. But preferably not having to re-do all the setup and customizations.

And I didn’t have to. Apt to the rescue.

$ apt-mark showauto > pkgs_auto.lst
$ apt-mark showmanual > pkgs_manual.lst

This will generate a list of .deb packages installed on the system. The first one with all the automatically installed packages, the second one all the manually installed packages from the commandline.

I also made a backup of /etc/apt/sources.list.d and /etc/apt/trusted.gpg.d. The first directory contains all the repositories I had in use on the original install, and the second directory holds all the GPG keys that go with these repositories. Important!

First install the system on the new drive, and make sure all updates are installed. You don’t need to install or setup anything but the base system. Now you can continue with the back ups and files you created earlier.

After I moved the two directories above to their respective place on the new install, and of course doing an sudo apt update && sudo apt upgrade to make sure all packages are still up to date, I loaded up the list of packages I created earlier.

$ sudo apt install $(cat pkgs_auto.lst)
$ sudo apt install $(cat pkgs_manual.lst)

This will create some errors due to packages that cannot be installed like this, or packages that were installed from a .deb file and aren’t located in any repository. Clean up those entries, and try again and let it run.

When it is finished, copy your /home/<user> from your old drive to your new drive and when you reboot and log back in as your user, everything should be just as it was before.

Success!

Prettify your fish shell

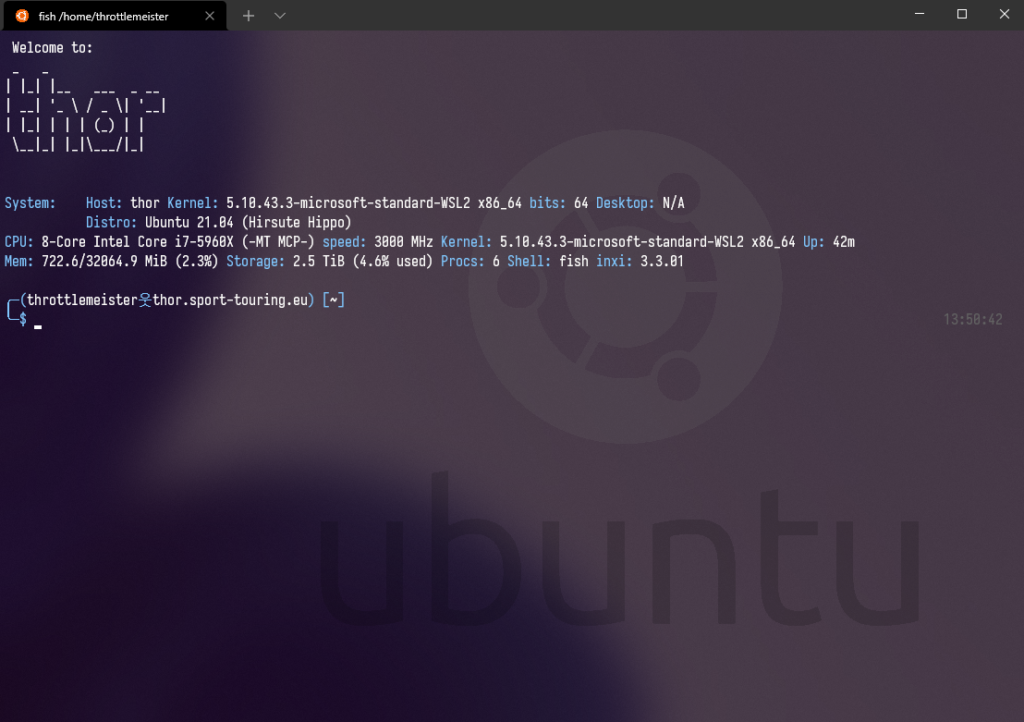
Windows Terminal running Ubuntu in WSL2 with Fish

I am using the fish shell these days. Fish stands for Friendly Interactive Shell. I like how programming the shell works and it has some very nice features like syntax and command highlighting you will not find in regular shells.

Note: important note if you are considering to use fish, fish is not a POSIX compliant shell. As such, for shell scripts that will need to work on any system you will still need to know how to script in sh/bash/ksh/etc. I do not consider fish to be a replacement for bash and it should not be the default shell on any system. It’s great as your interactive shell when working the console though.

With that out of the way, using a different or alternate shell can be fun but you probably also want it to look good. Or you want it to look the same or similar to your previous shell because that is what you are used to. As did I. I had a pretty nice prompt setup in bash, so I really wanted my fish shell to look and feel similar. This was the result:

fish prompt for root and regular user

To get this prompt, I created the following fish_prompt.fish under ~/.config/fish/functions.

# This theme is based on Bira theme from oh-my-fish (https://github.com/oh-my-fish/theme-bira)
# This theme also based on the default bash prompt of Kali Linux. (https://www.kali.org/)
# Created, modified and where possible bluntly stolen by throttlemeister.
#
# Bira theme from oh-my-fish listed abouve, based on:
# Theme based on Bira theme from oh-my-zsh: https://github.com/robbyrussell/oh-my-zsh/blob/master/themes/bira.zsh-theme
# Some code stolen from oh-my-fish clearance theme: https://github.com/bpinto/oh-my-fish/blob/master/themes/clearance/

function __user_host
  set fqdn (hostname -f)
  set -l content 
  if [ (id -u) = "0" ];
    echo -n (set_color --bold yellow)\((set_color --bold red)$USER(set_color --bold yellow)💀(set_color --bold red)$fqdn(set_color --bold yellow)\) (set color normal)
  else
    echo -n (set_color --bold blue)\((set_color --bold white)$USER(set_color --bold blue)웃(set_color --bold white)$fqdn(set_color --bold blue)\) (set color normal)
  end
end

function __current_path
  if [ (id -u) = "0" ];
    echo -n (set_color --bold yellow) [(set_color --bold white)(prompt_pwd)(set_color --bold yellow)] (set_color normal)
  else
    echo -n (set_color --bold blue) [(set_color --bold white)(prompt_pwd)(set_color --bold blue)] (set_color normal) 
  end
end

function _git_branch_name
  echo (command git symbolic-ref HEAD 2> /dev/null | sed -e 's|^refs/heads/||')
end

function _git_is_dirty
  echo (command git status -s --ignore-submodules=dirty 2> /dev/null)
end

function __git_status
  if [ (_git_branch_name) ]
    set -l git_branch (_git_branch_name)

    if [ (_git_is_dirty) ]
      set git_info '<'$git_branch"*"'>'
    else
      set git_info '<'$git_branch'>'
    end

    echo -n (set_color yellow) $git_info (set_color normal) 
  end
end

function fish_prompt
  if [ (id -u) = "0" ];
    echo -n (set_color --bold yellow)"╭─"(set_color normal)
  else
    echo -n (set_color --bold blue)"╭─"(set_color normal)
  end
  __user_host
  __current_path
  __git_status
  echo -e ''
  if [ (id -u) = "0" ];
    echo (set_color --bold yellow)"╰─""# "(set_color normal)
  else
    echo (set_color --bold blue)"╰─""\$ "(set_color normal)
  end
end

function fish_right_prompt
  set -l st $status

  if [ $st != 0 ];
    echo (set_color red) ↵ $st  (set_color normal)
  end
  set_color -o 666
  date '+ %T'
  set_color normal
end

Note: the latest version of this script can always be found on my GitHub here.

This prompt was, as the top comments indicate, not all my own and heavily borrowed and modified other prompt and resources. This exercise greatly helped me to understand the fishshell scripting language. This helped me to create some more scripts and functions to make my life in fish easier and simpler.

Mind you, sometimes bash is a lot simpler. For the same prompt, including checks for color support etc, the full bash equivalent for this in my .bashrc is this:

if [ -n "$force_color_prompt" ]; then
    if [ -x /usr/bin/tput ] && tput setaf 1 >&/dev/null; then
        # We have color support; assume it's compliant with Ecma-48
        # (ISO/IEC-6429). (Lack of such support is extremely rare, and such
        # a case would tend to support setf rather than setaf.)
        color_prompt=yes
    else
        color_prompt=yes
    fi
fi

if [ "$color_prompt" = yes ]; then
    PS1='${debian_chroot:+($debian_chroot)}\[\033[01;32m\]\u@\h\[\033[00m\]:\[\033[01;34m\]\w\[\033[00m\]\$ '
else
    PS1='${debian_chroot:+($debian_chroot)}\u@\h:\w\$ '
fi

host=`hostname -f`

if [ "$color_prompt" = yes ]; then
    prompt_color='\[\033[;94m\]'
    info_color='\[\033[0;1m\]'
    prompt_symbol=웃
    p_col='\[\033[1;33m\]'
    if [ "$EUID" -eq 0 ]; then # Change prompt colors for root user
        prompt_color='\[\033[1;33m\]'
        info_color='\[\033[1;31m\]'
        prompt_symbol=💀
        p_col='\[\033[0;1m\]'
    fi
    PS1=$prompt_color'┌──${debian_chroot:+($debian_chroot)──}('$info_color'\u'$p_col'${prompt_symbol}'$info_color'$host'$prompt_color')-[\[\033[0;1m\]\w'$prompt_color']\n'$prompt_color'└─\$\[\033[0m\] '
    # BackTrack red prompt

else
    PS1='${debian_chroot:+($debian_chroot)}\u@\h:\w\$ '
fi

Where basically only the last bit is what makes the prompt. And even that can be concatenated into a single line if you insert the colors directly instead of setting variables.

Did you know… (or, RHEL on LXC/LXD)

  • There are no RedHat Enterprise Linux (RHEL) LXC/LXD container images publicly available?
  • There are LXC/LXD container images available for CentOS and Fedora?
  • You can convert a CentOS install to RHEL using the Convert2RHEL tool?
  • This also works for a LXC/LXD container?
  • You will need to do this if you want to run RHEL on Proxmox in a LXC container?
  • You can create a tarbal of a running system to import into a vanilla LXC/LXD installation?
  • You will need to create a metafile.tar.gz with a few lines of information about the tarbal to do this?
  • You can also use an export from a Docker container to get the system?
  • And that you can also use an export from a WSL distribution for this?
  • This means you can set up a WSL environment on your Windows box (see other posts here) just the way you want with all the tools you need, and you can export it to run it independently in a LXC/LXD container as a server?

Tested distributions under WSL2

The following distributions I have installed/created, tested and used under WSL2 and Windows 10.

  1. Alpine Linux – extremely tiny; created from Docker image
  2. AlmaLinux – migrated from CentOS using AlmaLinux migration tool
  3. Arch Linux – created from virtual machine install
  4. CentOS 7 – created from rootfs image, then upgraded to latest version
  5. CentOS 8 – Upgraded from CentOS7
  6. CentOS Stream – upgraded from from CentOS8 install
  7. Deepin Linux – created from virtual machine install
  8. Debian 10 (“Buster”) – Microsoft Store
  9. Debian Testing (“Bullseye”) – upgraded from official Debian 10 release
  10. Devuan – migrated from Debian as installed from the Microsoft Store
  11. Fedora – created from virtual machine installation
  12. Gentoo – compiled from source using Stage3 tarball/rootfs iamge
  13. Kali Linux – Microsoft Store
  14. Oracle Linux – migrated from CentOS instance using CentOS migration tool from Oracle
  15. RedHat Enterprise Linux – created from virtual machine installation
  16. Rocky Linux – migrated from CentOS using RockyLinux migration tool
  17. Ubuntu – Microsoft Store
  18. Slackware – created from Docker image

As you can see, if you can find your favorite distribution in the Microsoft Store, great, if not or if its only available as a paid distribution, just bake your own. It’s not that difficult and really there is no reason why you should not have the Linux distribution of your choice available under WSL2.

Any Linux distribution on Windows 10 with WSL2

Introduction – WSL 2 on Windows 10 introduced the ability to run a native linux kernel on your computer while using Windows 10 as your main operating system. Instead of emulating a Linux kernel, like WSL 1 does, WSL 2 uses a lightweight hypervisor to run linux in parallel with Windows.
To be able to run WSL 2 on Windows 10, installation of Windows 10 feature update 2004 is required.

An explanation on how to enable WSL2 support can be found on the page detailing how to create a Gentoo instance on WSL2.

Any Linux distribution on Windows? – Yes, you can run any distribution of Linux on WSL quickly and easily, provided that:    
   1) a Docker image for that distribution is available.
   2) you install your distribution as normal in a virtual machine first

For the Docker method

docker pull <image name for your Linux distro>
docker create --name <distro> <image name for your distro>
docker export -o <distro>.tar <distro>

wsl --import "<distro>" "<location for your wsl distro>" "PATH/TO/<distro>.tar" --version 2

How does it work – The first line, the docker pull, downloads the docker image to your computer. This can be any image, as long as it is Linux based, but since you are trying to get a specific Linux distribution for use in WSL, the assumption is it is an image for a Linux distro.

The second line, the docker create, creates the docker container. It doesn’t start it, it just creates it so you don’t have to worry about containers all of a sudden taking up resources/

The third line, the docker export, dumps the container into a tar archive. This is the file we need for WSL and contains the entire Linux distribution. At this point, you can throw away your docker container if you want as we do not need it anymore.

Lastly, we are importing the tar archive we created from the docker container into WSL. We can now boot our newly created Linux distro of our choice in WSL and use it, modify it and work it like we want to.

NOTE: This process works in reverse as well! If you want to create and use a docker image from any WSL2 instance you have created you can simply export the WSL distro to a tar archive and import that into Docker and fire it up!

For the virtual machine method
After you have installed the virtual machine, log into the virtual machine and issue the following commands.

Note: this also works for physical Linux machine or dual boot system where you want to copy the Linux system to WSL!

$ sudo su -
# cd /
# tar -cpzf backup.tar.gz --exclude=/backup.tar.gz --exclude=/proc --exclude=/tmp --exclude=/mnt --exclude=/dev --exclude=/sys /

This will create a tar archive of the entire system. This can get quite big, especially if you are doing this from a previously installed system and not a clean, base install so make sure you have enough space to save it.

When the tar file has been created, copy it to your Windows machine somehow and issue the following command:

wsl --import "<Your_Distro_Name>" "<Location_to_store_your_Distro>" "PATH/TO/<archive.tar>" --version 2

This will create the WSL instance by side-loading it and you can start it by issueing wsl.exe -d <Your_Distro_Name> or by opening Windows Terminal; it should already be listed in the dropdown menu as one of the options.