Accessing WSL on Windows 11

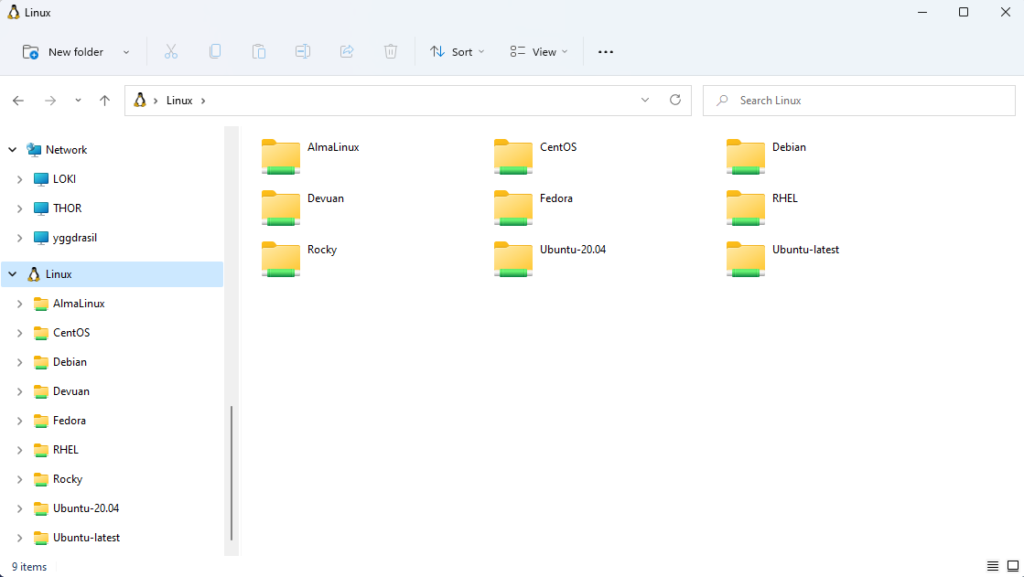
WSL filesystems in Windows Explorer on Windows 11

Moving files around between WSL instances and Windows just got a whole lot easier on Windows 11. All you need to do is scroll down in the left pane until you see Linux and can access the filesystem from any WSL instance to copy files to it, grab files from it and whatever it is you need.

Previously on Windows 10, you could access the special UNC path \\wsl$ to access the filesystem of a running WSL instance, but in Windows 11 you can access any WSL instance without the need to have it running.

Windows 11 on a unsupported computer

Yes, you can run the new Windows 11 beta or development versions on unsupported hardware. Yes, you will have heard all about it already. No, not every method is the same or works as well.

That said, most of what you see online are in my opinion methods that are not guaranteed to work or can in some cases be problematic.

This method described below always works, on every computer that can run and install Windows 10. Most likely, it will work with the release version of Windows 11, but we will have to wait to be sure obviously.

Step 1: Creating a Windows 10 ISO

Download the Media Creation Tool from the Microsoft site, run it and accept the license terms. It will get some things ready, or so it says so just wait.

When it is done, you are presented with two options:
o Upgrade this PC
o Create installation media (USB flash drive, DVD, or ISO file) for another PC

Select the second option and click next.

Select your language, edition and architecture and click next.

Select ISO image and click next. It will prompt you for a filename and location to save to. Then it should start downloading and generating your ISO file. Just let it run its course.

Step 2: Creating a Windows 11 ISO

Go to the UUP Dump website. This site will help you generate scripts to download and compile an ISO for the Windows software of your choice.

Note: These scripts download the necessary files directly from Microsoft, so it is safe and not some unknown source.

As of this writing, the latest version is “Windows 11 Insider Preview 10.0.22000.100 (co_release) amd64“. Click the release of your choice.

Select your language and click next.

Select your edition(s) and click next. I would choice just Windows 11 Pro here, however it is up to you.

Select Download and convert to ISO and below that, check all but component cleanup under conversion options. Click Create download package.

It will create and download a small zip file of a few kilobytes that contains scripts to create your ISO on Windows, MacOS or Linux.

Open an command prompt as Administrator and run the appropriate script. On Windows that would be uup_download_windows.cmd. Running this will take a while. Let it run. Go have a coffee. When it is done, you will have a Windows 11 ISO.

This ISO can be used on a supported machine to upgrade or install as normal.

Step 3: Creating a hybrid W10/W11 ISO

First we need to extract the Windows 10 ISO we created under Step 1. If you have a program like WinRAR, you can just right click the ISO file and extract or you can double click the ISO file to mount it, and then just copy all files and directories to a place on your hard disk.

When you have the contents of the Windows 10 ISO on your hard disk, navigate to the sources folder in the location you extracted or copied the ISO files to and find the file called install.esd. Delete it.

Now double click the Windows 11 ISO you created and navigate to the sources folder here as well. Again, find the file called install.esd. Copy it, and paste inside the sources folder of your Windows 10 files on your hard disk.

Now you basically have a Windows 10 DVD structure on your hard disk with Windows 11 content. We can now convert this file structure into a new, hybrid W10/W11 ISO.

First, you will need to download and install ImgBurn. Start the program and select Create image file from files/folders. It’s the middle option on the right side.

Select your source by selecting the location of your extracted or copied Windows 10 ISO on your hard disk where we just copied the Windows 11 install.esd to.

Select a destination where you want to save your newly created hybrid ISO to.

Under the advanced tab on the right side of the window, select “Bootable Disc” and make sure to check “Make Image Bootable”.

For the Boot image, browse to boot folder where you extracted your ISO on your hard disk and select the file etfsboot.com.

Lastly, under “Sectors To Load”, change the default of 4 to 8.

Now click the big button on the left bottom to create your new Hybrid ISO. This will be very quick.

Final words

What you have just created is a Windows 10 install disk that contains the Windows 11 files. Because of this, no pre-install checks on TPM, Secure boot or CPU are done and Windows 11 will be installed just like you are used to for Windows 10. After the install is finish, Windows does not do any post-install checks and it just boots and runs.

However, if you are like me and don’t meet most of the hardware requirements, you cannot turn on the Windows Insider option so you can download and install updates as they become available. To fix this, visit this GitHub site to download a small script to enable the Insider channel of your choice (mine is Beta) without even having to log in.

Tested distributions under WSL2

The following distributions I have installed/created, tested and used under WSL2 and Windows 10.

  1. Alpine Linux – extremely tiny; created from Docker image
  2. AlmaLinux – migrated from CentOS using AlmaLinux migration tool
  3. Arch Linux – created from virtual machine install
  4. CentOS 7 – created from rootfs image, then upgraded to latest version
  5. CentOS 8 – Upgraded from CentOS7
  6. CentOS Stream – upgraded from from CentOS8 install
  7. Deepin Linux – created from virtual machine install
  8. Debian 10 (“Buster”) – Microsoft Store
  9. Debian Testing (“Bullseye”) – upgraded from official Debian 10 release
  10. Devuan – migrated from Debian as installed from the Microsoft Store
  11. Fedora – created from virtual machine installation
  12. Gentoo – compiled from source using Stage3 tarball/rootfs iamge
  13. Kali Linux – Microsoft Store
  14. Oracle Linux – migrated from CentOS instance using CentOS migration tool from Oracle
  15. RedHat Enterprise Linux – created from virtual machine installation
  16. Rocky Linux – migrated from CentOS using RockyLinux migration tool
  17. Ubuntu – Microsoft Store
  18. Slackware – created from Docker image

As you can see, if you can find your favorite distribution in the Microsoft Store, great, if not or if its only available as a paid distribution, just bake your own. It’s not that difficult and really there is no reason why you should not have the Linux distribution of your choice available under WSL2.

A couple little Windows things

I recently had a discussion on a forum on the usefulness of virtual desktops and the implementation on Windows 10. Now everyone can have their opinions on virtual desktops and I do as well, but in that discussion some things came up that are apparently not so well known.

  1. Some people find it cumbersome to switch between virtual desktops to the point it becomes unusable for them. They need to go to Task View (WIN+TAB), then use the mouse to click the desktop they want.

    What people do not realize, is there is of course a keyboard shortcut for this too. Just hit CTRL+WIN+→ or CTRL+WIN+← to switch/scroll through all the virtual desktops you have created.

    Bonus tip: when in Task View, you can drag and drop any open window into any existing virtual desktop, or even on a new one to organize your windows.
  2. Some people find it a great feature that Windows launches programs in each virtual desktop in their own process. Others find that annoying. Few people seem to know, you can choose the behavior you want with the correct settings:

    Go to: Settings -> System -> Multitasking

    Then, under Virtual desktops, you will see the first line that says: “On the taskbar, show windows that are open on” with a drop down. This dropdown has two options. The first is “All desktops” and the second is “Only the desktop I’m using”.

    “All desktops” will have programs share process, so if you click an open program in the taskbar, it will switch to the desktop it is running on and make the window active. The other option will start a new instance of that program on the desktop you are on if it is not running there.
  3. Some people do not like the new timeline feature in the task view screen (WIN+TAB). This can be turned off if you want.

    Go to: Settings -> Privacy -> Activity history

    On that page, uncheck both items. Scroll down and toggle all accounts for which activities are shown, and done. No more timeline when doing WIN+TAB

Any Linux distribution on Windows 10 with WSL2

Introduction – WSL 2 on Windows 10 introduced the ability to run a native linux kernel on your computer while using Windows 10 as your main operating system. Instead of emulating a Linux kernel, like WSL 1 does, WSL 2 uses a lightweight hypervisor to run linux in parallel with Windows.
To be able to run WSL 2 on Windows 10, installation of Windows 10 feature update 2004 is required.

An explanation on how to enable WSL2 support can be found on the page detailing how to create a Gentoo instance on WSL2.

Any Linux distribution on Windows? – Yes, you can run any distribution of Linux on WSL quickly and easily, provided that:    
   1) a Docker image for that distribution is available.
   2) you install your distribution as normal in a virtual machine first

For the Docker method

docker pull <image name for your Linux distro>
docker create --name <distro> <image name for your distro>
docker export -o <distro>.tar <distro>

wsl --import "<distro>" "<location for your wsl distro>" "PATH/TO/<distro>.tar" --version 2

How does it work – The first line, the docker pull, downloads the docker image to your computer. This can be any image, as long as it is Linux based, but since you are trying to get a specific Linux distribution for use in WSL, the assumption is it is an image for a Linux distro.

The second line, the docker create, creates the docker container. It doesn’t start it, it just creates it so you don’t have to worry about containers all of a sudden taking up resources/

The third line, the docker export, dumps the container into a tar archive. This is the file we need for WSL and contains the entire Linux distribution. At this point, you can throw away your docker container if you want as we do not need it anymore.

Lastly, we are importing the tar archive we created from the docker container into WSL. We can now boot our newly created Linux distro of our choice in WSL and use it, modify it and work it like we want to.

NOTE: This process works in reverse as well! If you want to create and use a docker image from any WSL2 instance you have created you can simply export the WSL distro to a tar archive and import that into Docker and fire it up!

For the virtual machine method
After you have installed the virtual machine, log into the virtual machine and issue the following commands.

Note: this also works for physical Linux machine or dual boot system where you want to copy the Linux system to WSL!

$ sudo su -
# cd /
# tar -cpzf backup.tar.gz --exclude=/backup.tar.gz --exclude=/proc --exclude=/tmp --exclude=/mnt --exclude=/dev --exclude=/sys /

This will create a tar archive of the entire system. This can get quite big, especially if you are doing this from a previously installed system and not a clean, base install so make sure you have enough space to save it.

When the tar file has been created, copy it to your Windows machine somehow and issue the following command:

wsl --import "<Your_Distro_Name>" "<Location_to_store_your_Distro>" "PATH/TO/<archive.tar>" --version 2

This will create the WSL instance by side-loading it and you can start it by issueing wsl.exe -d <Your_Distro_Name> or by opening Windows Terminal; it should already be listed in the dropdown menu as one of the options.

Gentoo on Windows with WSL2

Introduction – WSL 2 on Windows 10 introduced the ability to run a native linux kernel on your computer while using Windows 10 as your main operating system. Instead of emulating a linux kernel, like WSL 1 does, WSL 2 uses a hypervisor to run linux in parallel with Windows.
To be able to run WSL 2 on Windows 10, installation of Windows 10 feature update 2004 or newer is required.

Enabling WSL2 support – Open an administrator PowerShell by pressing Windows + X, then A or select PowerShell (Run as Administrator) from the start menu. Execute the following commands to enable the hypervisor to start on system boot.

Enable-WindowsOptionalFeature -Online -FeatureName Microsoft-Windows-Subsystem-Linux
Enable-WindowsOptionalFeature -Online -FeatureName VirtualMachinePlatform

Download the latest stage 3 build from the gentoo website (https://gentoo.org/downloads/). Select the profile which suits your needs. In my case I decided to use the most up-to-date, non-hardened, no-multilib, amd64 stage3 build.

Quick-Link to index: current-stage3-amd64-nomultilib

non-hardened: This is only a development system, so no hardening is needed.
no-multilib: Who needs x86 support anyway when compiling from source?
amd64: Because an up-to-date Windows 10 should be running on an up-to-date amd64 plaform.
Convert the tar.xz archive into an uncompressed tar archive by opening it with 7-Zip and selecting the extract option from the menu. Or use a Linux distro on WSL already installed. Do not extract the linux filesystem packed in the tar archive.

Open an administrator command promt / PowerShell by pressing Windows + X, then A or select PowerShell (Run as Administrator) from the start menu. Run the following command to import the userspace image into your WSL configuration. Be sure that you provide full paths and didn’t forget the –version argument. The destination path can be adjusted to your liking and is preferably on an SSD with at least 25 GB of free space. The import command will create a single virtual disk image (ext4.vhdx) in the destination folder.

wsl.exe --import "Gentoo" "D:\path\to\your\installation\directory" "C:\path\to\your\folder\stage3-amd64-nomultilib-20191113T214501Z.tar" --version 2

If you forgot the –version switch, the result of the command above is an extracted linux filesystem in the specified Windows folder. Remove the distribution with wsl –unregister and restart the import operation.

WSL setup in Gentoo – As with every new piece of software, the configuration needs some changes on the WSL / Gentoo side to run smoothly. Run the following commands on the Gentoo instance to fix problems with a non-functional nameserver configuration and file system attributes on Windows drives.

#!/bin/bash
set -e -x

# Delete auto-generated files
rm /etc/resolv.conf || true
rm /etc/wsl.conf || true

# Enable changing /etc/resolv.conf
# Enable extended attributes on Windows drives
cat <<EOF > /etc/wsl.conf
[network]
generateResolvConf = false

[automount]
enabled = true
options = "metadata"
mountFsTab = false
EOF

# Use google nameservers for DNS resolution
cat <<EOF > /etc/resolv.conf
nameserver 8.8.8.8
nameserver 8.8.4.4
EOF

Create a .wslconfig configuration file for WSL in the Windows user directory. This is necessary to set a maximum size limit of the RAM which WSL may consume. Sometimes the linux kernel uses a portion of the free memory as cache and therefore will start to “eat away” all RAM of the host system. This can be mitigated by setting the memory configuration option. Replace YOURUSERNAME with your Windows username in the script below.

#!/bin/bash
set -e -x

cat <<EOF > /mnt/c/Users/YOURUSERNAME/.wslconf
[wsl2]
#kernel=
memory=8GB
#processors=
#swap=
#swapFile=
localhostForwarding=true
EOF

Now close all instances of Gentoo / WSL and stop the virtual machine by opening the Command Prompt (Windows-Key + X, then A) and issuing the command wsl –shutdown.

Gentoo setup in WSL – Run all following commands in the Gentoo instance.

For gentoo to work correctly under the hypervisor some feature flags have to be disabled. Open the file /etc/portage/make.conf and adjust the following settings. Below is an example configuration used for my system.

– Add FEATURES=”-ipc-sandbox -pid-sandbox -mount-sandbox -network-sandbox” to disbable the non-functional sandboxing features
– Adjust COMMON_FLAGS to match your PC architecture.
– Adjust USE to your needs
– Ajdust MAKEOPTS to the number of CPU cores (+1) to make the compilation faster
– The other options are all optional

# No GUI (-X -gtk), only english error messages (-nls)
USE="-X -gtk -nls"

# Enable python 3.7 and set 3.6 as default
PYTHON_TARGETS="python3_6 python3_7"
PYTHON_SINGLE_TARGET="python3_6"

# Define targets for QEMU
QEMU_SOFTMMU_TARGETS="aarch64 arm i386 riscv32 riscv64 x86_64"
QEMU_USER_TARGETS="aarch64 arm i386 riscv32 riscv64 x86_64"

# No hardware videocard support
VIDEO_CARDS="dummy"

# Disable non-functional sandboxing features
FEATURES="-ipc-sandbox -pid-sandbox -mount-sandbox -network-sandbox"

# Always ask when managing packages, always consider deep dependencies (slow) EMERGE_DEFAULT_OPTS="--ask --complete-graph"

# Enable optimizations for the used CPU
COMMON_FLAGS="-march=haswell -O2 -pipe"
CHOST="x86_64-pc-linux-gnu"
CFLAGS="${COMMON_FLAGS}"
CXXFLAGS="${COMMON_FLAGS}"
FCFLAGS="${COMMON_FLAGS}"
FFLAGS="${COMMON_FLAGS}"
MAKEOPTS="-j5"

# NOTE: This stage was built with the bindist Use flag enabled
PORTDIR="/var/db/repos/gentoo"
DISTDIR="/var/cache/distfiles"
PKGDIR="/var/cache/binpkgs"

# This sets the language of build output to English.
# Please keep this setting intact when reporting bugs.
LC_MESSAGES=C

Final installation steps – To finish the Gentoo installation a new snapshot of the ebuild repository should be downloaded. A recompilation of the compiler ensures that GCC is on the most recent stable version. After updating GCC a recompilation of all programs / libraries ensures that the set optimizations take effect.

#!/bin/bash
set -e -x

# Download a snapshot of all official ebuilds
emerge-webrsync

# Upgrade the compiler and the required libtool library
emerge --oneshot --deep sys-devel/gcc
emerge --oneshot --usepkg=n sys-devel/libtool

# Update all packages with the newly built compiler
# This will take a long time, ~1-5 hours
emerge --oneshot --emptytree --deep @world
emerge --oneshot --deep @preserved-rebuild
emerge --ask --depclean

Enabling overlays for portage – Eselect provides an easy integration of overlays into portage. The main portage respository should already be configured properly, so only a simple installation of eselect is necessary. For more information see the official wiki. Run the command shown below to install the repository module for eselect.

#!/bin/bash

# Install portage overlays
emerge --ask app-eselect/eselect-repository 

The configuration for the plugin is located in the /etc/eselect/repository.conf file. The default path of the repository index is specified by the REPOS_CONF option which points to /etc/portage/repos.conf by default. Make sure that this directory exists or create it with the following command.

mkdir -p /etc/portage/repos.conf

A file named gentoo.conf should be located in this directory (/etc/portage/repos.conf) which holds the configuration for the main gentoo repository. Below is an example default configuration file which was created on my system.

[DEFAULT]
main-repo = gentoo

[gentoo]
location = /var/db/repos/gentoo
sync-type = rsync
sync-uri = rsync://rsync.de.gentoo.org/gentoo-portage/
auto-sync = yes
sync-rsync-verify-jobs = 1
sync-rsync-verify-metamanifest = yes
sync-rsync-verify-max-age = 24
sync-openpgp-key-path = /usr/share/openpgp-keys/gentoo-release.asc
sync-openpgp-keyserver = hkps://keys.gentoo.org
sync-openpgp-key-refresh-retry-count = 40
sync-openpgp-key-refresh-retry-overall-timeout = 1200
sync-openpgp-key-refresh-retry-delay-exp-base = 2
sync-openpgp-key-refresh-retry-delay-max = 60
sync-openpgp-key-refresh-retry-delay-mult = 4
sync-webrsync-verify-signature = yes

The synchronization of emerge can now be done via the command below. This might take some time, depending on the internet speed and if the repository was synchronized before.

emerge –sync

Using Git for portage sync – An alternative method to sync the portage repository is to use git. For this the git package has to be installed on the system as shown below.

#!/bin/bash

# Install the git version control system
emerge --ask dev-vcs/git

Edit the sync-type and sync-uri in the portage configuration file under /etc/portage/repos.conf/gentoo.conf as shown below.

[DEFAULT]
main-repo = gentoo

[gentoo]
location = /var/db/repos/gentoo
#sync-type = rsync
#sync-uri = rsync://rsync.de.gentoo.org/gentoo-portage/
sync-type = git
sync-uri = https://github.com/gentoo-mirror/gentoo.git
auto-sync = yes
sync-rsync-verify-jobs = 1
sync-rsync-verify-metamanifest = yes
sync-rsync-verify-max-age = 24
sync-openpgp-key-path = /usr/share/openpgp-keys/gentoo-release.asc
sync-openpgp-keyserver = hkps://keys.gentoo.org
sync-openpgp-key-refresh-retry-count = 40
sync-openpgp-key-refresh-retry-overall-timeout = 1200
sync-openpgp-key-refresh-retry-delay-exp-base = 2
sync-openpgp-key-refresh-retry-delay-max = 60
sync-openpgp-key-refresh-retry-delay-mult = 4
sync-webrsync-verify-signature = yes

Portage will now complain when synchronizing with git for the first time that the repository folder is not empty and that the folder can not be used to clone the git repository into it. This can be fixed by deleting the old rsync-managed repository which is located under /var/db/repos/gentoo when using the default configuration. Use the command below to do this.

#!/bin/bash

# Remove old and generate new repository
rm -r /var/db/repos/gentoo
emerge --sync

# Sync twice to test synchronization speed
emerge --sync

Final bits and bobs and clean-up – Now that we have Gentoo installed and working in WSL2, we should do some cleaning up and do some things to make our lives easier.

First, it would a good idea right now to create and export of our installed Gentoo WSL distribution.

wsl.exe --export Gentoo gentoo.tar

Store this file somewhere safe. You can use this later to import the Gentoo again if needed, or use it on another computer without having to go through all the steps above.

Now would also be a good time to add a user to Gentoo that you would normally use, instead of using root. If you are installing Gentoo and have come this far, I probably don’t need to explain how to create a user on Linux. So I am not going to.

After you have created the user, note the user ID. Normally, this would be 1000.

To set the default user for Gentoo to use, we cannot use the normal procedure as used for distributions installed from the Windows store. Instead, we need to open the registry editor and navigate to:

HKEY_CURRENT_USER\SOFTWARE\Microsoft\Windows\CurrentVersion\Lxss

You will see a list of folders with seemingly random names. One of these is for Gentoo, probably the bottom one. Find the one for Gentoo, and edit the key named “DefaultUid” and set the value to (decimal) 1000 or the number from your user ID if it is something else.

WARNING: if you do this before you have created your username on Gentoo, the distribution will be unusable, however you can fix it by changing the “DefaultUid” back to zero. Changes are in effect immediately; no need to reboot after changing this value.

PRO TIP: If you want to be able to change parameters using the .exe of the distribution as you can when you are using for instance Ubuntu or Debian from the store, grab the .exe from one of these store distro’s and put it in the directory where you installed Gentoo. Then rename the file to the name of the distribution as you have added it to WSL. You can now start your distribution using that .exe and for instance set the default user the normal way.